

Going to enter this over at Simon says stamp blog Wednesday challenge its anything goes.
Have a great day
Sandy :)


 I again used my supply of manila folders and painted them front and back with the Gelli plate adding layers.. Then I got out my stencils and added shapes and colour to add a bit of pop here and there with the blending tool and distress ink.. Because I had mine separate unlike an envelope I was able to sew over all my washi tape making the slots that much sturdier.. I added fabric and lace at the top and bottom its sewed between the 2 manila folders and also added some dowel and a string hanger at the top.. I can still fold this in half as on the other side it still has a closure to fold it up like a book with a brad that I can pop the string around. I like having it hanging on my wall, it will be a great motivation to keep doing the rest of the tags so I can have it all full.


 Today I used one of the pages in my journal that I rub the stencils off to clean them off. So there was some black hexagons and some pinky coloured circles on the page.. I thought something that goes on here will have to really stand out.. I always like drawing these trees in black so I drew one of those with my paint pen.. That was as far as I got then I got stuck and moved onto another piece of art on a big index card.. That was going along fine till I did some stenciled lettering on it and it all smudged.. I hate it when it all goes smudgy.. So then I thought hmm I really like bits of this and I never waste painted papers so I started cutting it into hearts. You can always use painted hearts on all sorts of art projects. I have tin of houses and hearts to use. So I still had the tree page sitting there looking at me. So I drew some lines off my tree grabbed a heart punch and started using all the bits of the left overs to punch out hearts..
  I added a bit of washi tape with some little circles on it and that great Prima stamp that I am hooked on at the moment with some black Momento ink.. Used one of the bigger hearts on the other side to tie it all together on some dangled swirls and added the words "Trust your heart'.. I went around all the hearts with my stabilo black pencil and then water and added a few bits of white pen doodling.. So hope you like my leftover mistake page of hearts..
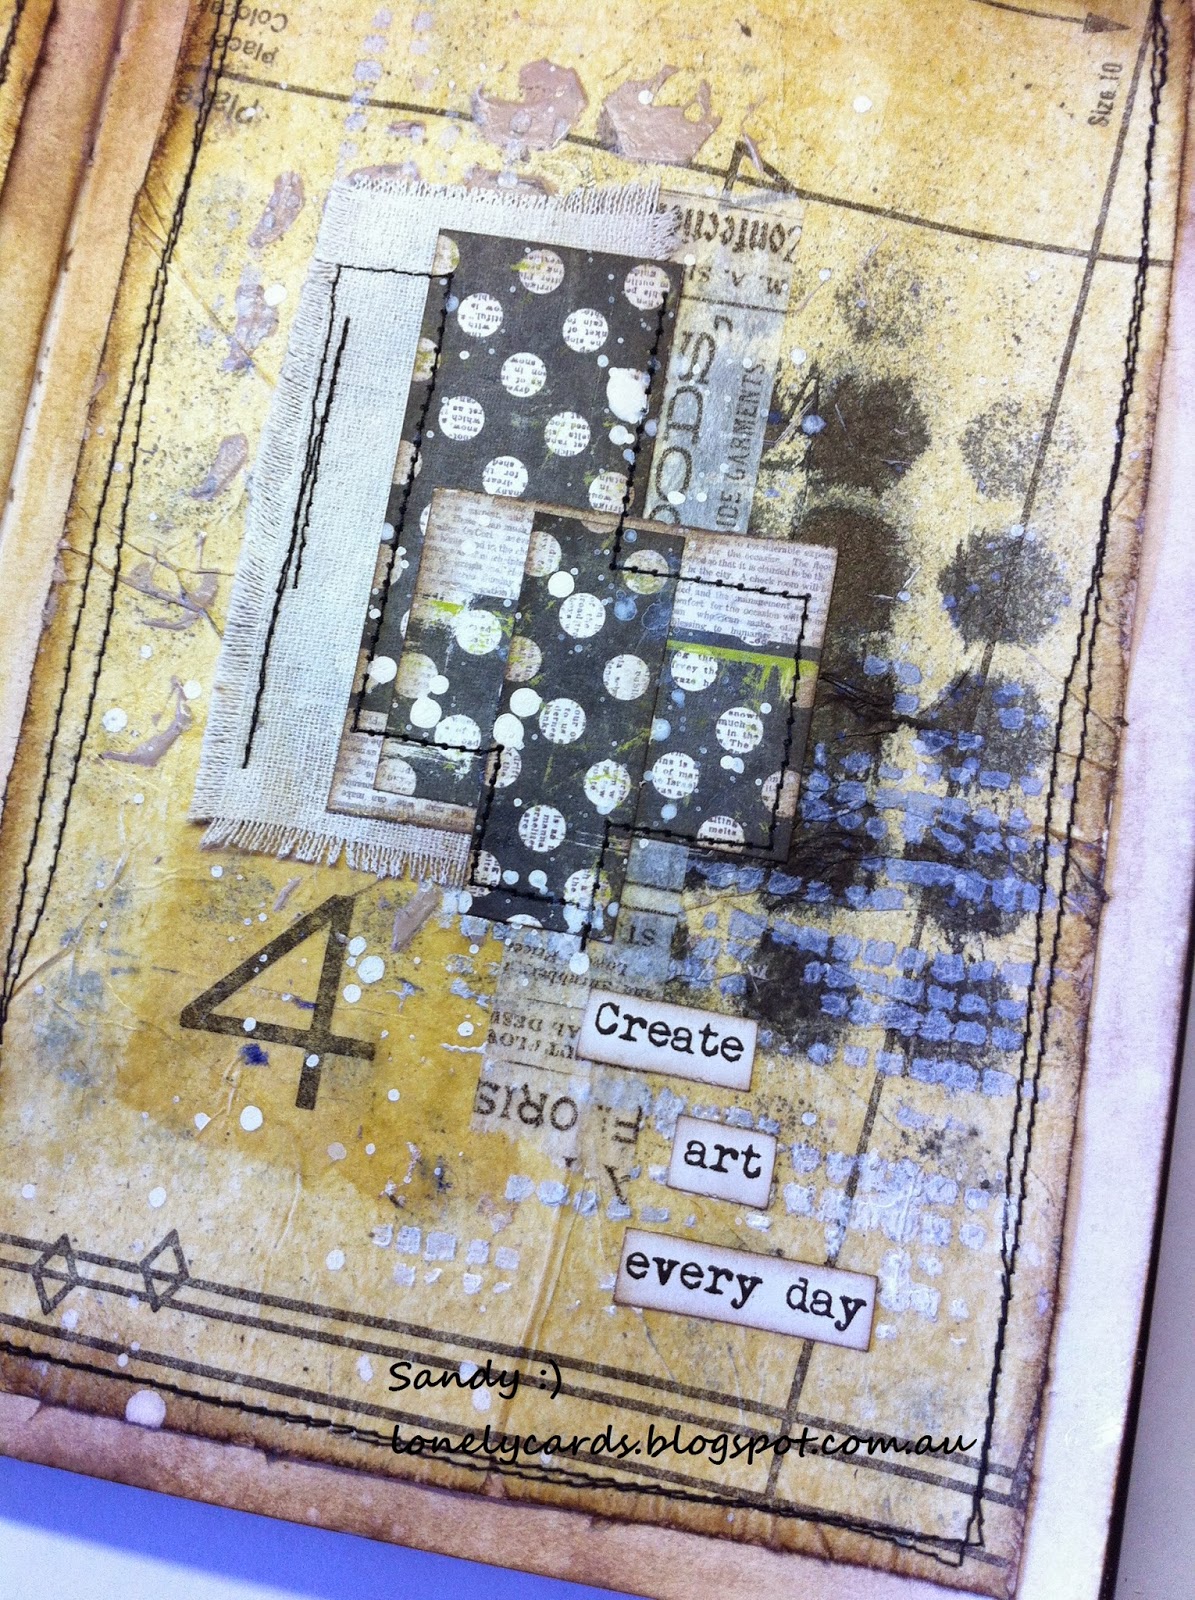
 Collage is done with the Kaisercraft, Authentique and the craft paper is stamped with a Tim Holtz Stampers Anonymous stamp. I then sewed all around everything with my sewing machine, my favourite part to do at the moment, other than the inky bits.. I typed 2 whole pages of all different quotes and printed them out onto card stock from my printer.. So these are such fun to just pick one and add it onto my pages.. Distressed all the edges of the collage elements and then inked them all with more of the tea dye distress stain. The photo that I used I got from The last door down the hall freebies - siblings so cute..


 The first stop on our sightseeing tour was to the Bollards at the Geelong waterfront. The colourful bollards are the work of artist Jan Mitchell. Jan was commissioned by the City of Geelong to transform old timbers and piles from a city pier, demolished in the 1980's. Jan turned over 100 of them into remarkable works of art.. They are all along the bay waterfront and also at the Melbourne airport. I was lucky enough to stop by a few times and watch her paint them and talk to her myself she was a lovely lady. Sadly she passed away in 2008 but what a legacy of work to leave behind.

 |
| This houses the carousel unfortunately it was shut at the time. |

 Above and Below depicts members of the Volunteer Rifle Band playing in Geelong's first band recital in 1861.. Flat Susan sat on the music stand looking at them all..
  We have done a lot in the few weeks that Flat Susan has been with us.. So many photos so will split it up into 3 blog posts. Hope you enjoy her posts. We are enjoying her stay with us she will be zooming off to Spain this Friday. But before Flat Susan goes we are off to the Surf coast beaches tomorrow..
  |
| Corio Bay Geelong Victoria Australia The Bollards are all around the bay area |


 Last night I watched a great youtube tutorial from Nika in wonderland I loved the circles, so I had to have a go at this one.. I showed this to my friend Tamiko and she said it looks like she was peeking out from under the water.. So then I stamped little bubbles on it.. It was fun but I am terrible at waiting for gesso to dry, I get impatient, it adds lots of texture when I am popping my finger in it to see if it is dry or not.
 Its the last day of Art every day month so linking this up my little tribute to a fantastic month of art..


 Love my cats so thought it was about time that I popped one on a journal page.. I drew this cat in my sketch book a few weeks ago.. I coloured it in last night with watercolour pencils and thought, oh think she needs a page to sit on.. So this was another of my squish pages. Its leftover Dylusion sprays squished in my art journal.. I added the letters in black and put the cat on there and thought yep she suits it on those colours, but what to put on the other page? She so looked like there was something interesting over on that page.. So thought hmm string how do you draw string? So after looking at some pictures of balls of string, I drew this painted it and stuck it on there too.. She looks like she is contemplating that string now.. Then to find a quote, found this one and thought yep perfect.. Life is like a cat playing with an endless ball of string..


 Hi all, just a bit of fun in my art journal today.. I used one of the squish pages, you know when you get extra spray ink on a stencil from something else and you squish it into your journal.. You get some great backgrounds to play with that way.. This was a circle stencil that I had sprayed with Dylusions.. Then I filled in some of the circles with neocolor II, and used a waterbrush to smooth it out.. Went around it with the stabilo pencil in black and then thought hmm its a bit plain. So I then added the mini tile texture stencil with black ink and added a tag.. I gave the tag the same treatment but instead of the dylusions I just used the neocolor II's. Inked all the edges with black ink. Then I watered down some Gesso and splashed it all. It was a fun page to do. I am trying to leave a bit more of the white in my backgrounds and not cover everything up.. The tag has the words from a stamp from Kaszzaz it say's 'It's the little things'.


