Sunday, December 20, 2015

Never Hide Your Wings...

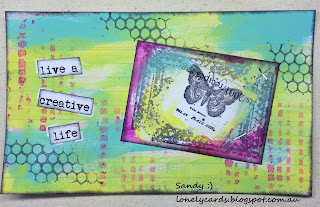
I recently picked up an old book on birds from the second hand shop and have really liked using it in collage, on pages in my art journal.


I just rummaged in my scrap paper box and ripped up papers for the other bits and pieces on the page. I like collaging random pieces together and trying to kind of fit them together into something completely different.  I found that strip of butterflies along the edge of some papers and thought they just kind of fit on.  I used DecoArt Americana paints in Sea Breeze and Cadmium Yellow.  Used my favourite stencil from Balzer designs mini tiny circles with the Sea Breeze and a make up sponge. Also added the little Prima stamp in black. Finished off by adding a little writing "Never Hide Your Wings" always fun to write on my art journal pages.


 It was great to get some time in my art journal. While it was so hot and not being able to do much of anything else. Loved listening to Ed Sheeran's X album while I was doing my art, all the songs are just very relaxing to listen to.

Have a great day
Sandy :)

Saturday, December 19, 2015

Helmar

Movie ticket gift pockets.
Are you giving away cards, money or movie tickets this Christmas. I like to give them in these gift pockets I make. So thought I would show how I make them. You can make them any size and they just make giving a gift card or movie ticket a bit more special.


Check out all the details and measurements over on the Helmar Design Team page
Hope you find these a handy little addition to your gift giving this Christmas Season. 
Happy Holidays.  

Thursday, December 3, 2015

Notebook pocket folder

This week I am busy making these nifty Notebook pocket folders.


To make my notebook pocket folder I first  gathered all the things I am always looking for. Note paper, sticky notes to mark pages and something to write a list on. 


I used the  Helmar Craft Glue a manila folder some pretty Kaisercraft papers and washi tape, a little distress ink and I was done. Feeling very organised. To check out all the details, more photos and measurements check out the whole post over at the Helmar design team post. 


Have a great day
Vicki-Ann :)

Thursday, November 5, 2015

Fascinator hat with Helmar

Over on the Helmar Design Team page this week I go into details about how 
I made a fascinator hat for the Melbourne cup. 
I have never made a hat before and it was a fun to challenge myself by doing something
 outside of my comfort zone. 


I just used things I had here. I started by gathering up items I thought that I could make a hat out of. The only things I had to buy was the headband and the little bit of milliners lace. I really like the delicate look of that lace so knew I wanted to add that on it. 


It ended up being a fabulous race for the Melbourne cup the first time a female Jockey won and at 100 to 1 odds wish I had of had a few dollars on it. 
Have a great day 
Vicki-Ann :)

Saturday, October 24, 2015

Happy Halloween

This week for Helmar I have made a spooky Halloween tag. I used the wonderful Tacky Craft glue and made some fabulous spider webs. They turned out so well. I have stored the extras just on a sheet of card stock so I am all ready to make even more creepy items in the future.  

For more information and all the details head over to the spooktacular Helmar page. Dont forget to check out what all the wonderful Helmar design team are making. There is lots of awesome Halloween themed items all using different Helmar products. So grab a cuppa and check out what we have all been up to and hope you get all inspired to make some Halloween themed items to make your Halloween the best ever..  

Happy Halloween
Vicki-Ann :) 

Thursday, October 15, 2015

Fun with some Art Journaling...

 I have not posted for a while but have been playing in my art journal. Lot going on at the moment. We are renovating our kitchen and bathroom, so I have just been doing fun quick art journal pages that take no time and are done in layers. So would do a layer, just a background and then come back and do the next layer. Leave that, come back and do some words and doodling. 

For this one when I did the background to the left. I just played with paint and stencils. I then cut out a heart in some book covering plastic. I held that over the top and used DecoArt Media Black Gesso to go around it with a makeup sponge. I then used some DecoArt Media Modeling paste and the cute Balzer designs Mini Circle stencil and gave it some great texture.

I used a fabulous napkin for this one just cut out the butterfly and then made some flowers out of some other pieces of the design. Doodling some stems and around the circles. I always like that part. The backgrounds were all done using Decoart Americana paint on both of these. 

There is other pages to come yet, so keep a look out for another post soon. 
Have a great day
Sandy :)

Saturday, October 3, 2015

Simplicity and Helmar...


Well its that time again.  Its Helmar Design Team post day..
Today I am sharing a canvas I made. Look at all that wonderful texture. I am using my all time favourite glue for all my sewing collage elements. The wonderful Tack craft glue. 
Want to see more pop over to the Helmar blog and I go into lots of detail with what I used and with more detailed pictures. 
Very exciting news that I have been asked to stay on the Helmar design team for another 6 months, Woohoo.. 

Have a great day.
Vicki-Ann :) 


Tuesday, September 29, 2015

Closer...

Fun collage and layering today.  I got 2 new stencils so they had to go in my art journal.  I have been after that Balzer Designs Mini tiny circle one for a while. I just love the way it looks. Think there is something about circles and splatters yep, I know, I am hooked on stencils.  

Started off with DecoArt Media Line Gesso on both pages. Then I used the DecoArt Americana Desert Turquoise and the Margarita coloured paints and painted that on with a paint brush, blending together with a bit of Blue Mist here and there. Then it was stencil time and used the Tim Holtz Argyle stencil with the Blue Mist paint and a makeup sponge. I very lightly went over the background on both pages, leaving some spots empty.  I then grabbed the Balzer designs Mini Tiny circle stencil and the Lamp black paint. Just randomly stenciled here and there. Then it was time for a focal point. Some collage today. So I found this great quote in amongst my stash of papers from Kaisercraft and painted some book papers to match my background. I went around all the papers with Tim Holtz distress ink in Tea Dye adding a layer of hessian and a piece of a hexagon die cut, torn into pieces. I used Helmars Tacky craft glue to piece them together let them dry thoroughly and then sewed around the quote and in random places. I then used more Helmars Tacky craft glue and stuck them down in my Moleskine art journal.  To finish off I covered my collage elements with scrap paper and used some watered down Gesso and a fan brush to add white splatters. I always think it ties it all together nicely at the end. Then with my round blending tool and black momento ink I went around the edges of the pages. That's it, all done for another double page spread. I really like the way these colours blend and the way the Argyle stencil in the Blue Mist used both in the background and through the stencil looks so like it is supposed to be there.

I am linking this up with Balzer Designs, Art Journal every day. 

Have a great day 
Sandy :)

Wednesday, September 23, 2015

Bloom...

Spring has sprung here in Australia and I am loving all the flowers and colour in my garden. So decided to paint some in my Molskine art journal. 

I used the DecoArt Americana paints in Petal pink, Vivid Violet and Wild Orchid in my first layer. Then I used Wisteria with the Andy Skinner stencil Tornado and a make up sponge. I used one side of the stencil and moved it across the page on both sides. Then I drew in my flowers overlapping the petals and painted them in a layer of DecoArt Media line Gesso. Then painted over them in Sea Breeze such a lovely blue they really popped. I did a swish of Primary Yellow in the middle of the flowers over the Gesso then I added more Gesso to blend it in. I doodled flower stems in and went around the flowers in black pen adding stamens to my flowers and filling in bits here and there with my Signo white pen. The stamping was with a tiny set of stamps I have from Studio G. Bloom where you are planted, seemed the perfect quote for this page. Went around the edges of the pages to frame it with my blending tool and the Momento black ink. 

I am popping this in the link over at Balzer Designs and over at 
Mix it Monthly its Mixed media flowers this month. 

Have a great day
Sandy :)

Tuesday, September 8, 2015

Excuses...


I wanted to practice more faces. So I tried out one with a bit more of an angle to her head. 

I used my Neocolor IIs and my waterbrush in my Moleskine art journal. I added some highlights with some white and skintone acrylic paint to her face.  I only have the 15 pack of Neocolor IIs, so really only the one face tone colour in that pack.  I cut the banners out of book paper and gave them little highlights with the Neocolours.  Used some sequin waste and sponged some Gesso through it in the background and then a little stamping with my France Papillon cube stamp. Added a little doodling with some dangle hearts with pens.  

She woke up one day and threw away all her excuses. Thought that quote kind of suited her, she looks very carefree. 

Going to link this up at Balzer Designs, Art Journal every day

Have a great day
Sandy :)

Sunday, September 6, 2015

Steampunk Canvas...

Happy Fathers Day to all the Dad's in Australia  and New Zealand. 
For this special day I made my husband a Steampunk inspired canvas. He loves trains, cars, gears and anything mechanical.

I used Lindy's sprays on my canvas to get the sparkle and that great grungy brown background colour.  
To get the copper look on my canvas I used Helmars Tacky craft glue and black card stock. I layered the black card stock in an overlapping pattern and then rubbed DecoArt Gold Rush Metallic Lustre onto the card stock with my finger. Making sure not to cover it all up so I get some black showing through. Then I added brads to all the corners so it looked like rivets. 

For the finished steampunk canvas and more details pop over to the 

Teams I design for
Have a great day 
Sandy :)

Friday, September 4, 2015

A Beautiful Heart...

It was Friday craft and art morning with my friends and today I did this background page in my Moleskine art journal. 


I cut a heart out of book paper and painted it in DecoArt American Blue mist and Advocado dip. Some Lamp black for the little circles through some sequin waste. Then I grabbed a little top from one of my sprays and did some circles. I used a card for the background and my finger for blending, just using the same colours I used on my heart. I used a bit of the Americana Flesh tone on to start and worked in layers from that neutral colour and then used that same colour on the top layers. 

When I came home I wrote the quote. I have been wanting to use this big quote. I have had it in my little quote book for ages, just waiting for the right page. 

A Beautiful heart can bring 
things into your life that all the
money in the world couldn't obtain. 

By Dau Voire. .

Posting this over at Paint Party Friday 

Have a great day
Sandy :)

Tuesday, September 1, 2015

Faithful Friend

Misty my cat has been very interested in what I have been doing the last few days. So it was inevitable that she would inspire a page in my moleskine art journal. 


I always use DecoArt Media Gesso on my pages first it gives it a great base to work on and makes my pages really sturdy. I used a flower stencil and some DecoArt  Modeling paste over the Gesso. I then used the DecoArt misters in Shimmer Turquoise and Yellow and the Primary Magenta over the top of  the flowers.  I went around that with the DecoArt Americana Turquoise Blue with a paint brush and grabbed a small sponge and dabbed in places. I then re sprayed the flowers over the top. I liked the layers it added. I used the side of a card and some Americana Snow white paint to add some lines. Added some water to a little Gesso and added the splatters.  I drew my cat on watercolour paper and painted her in Americana Vivid Violet and more of the Turquoise Blue in patches blending them together. I then cut her out and glued her on the page, shading around her and adding whiskers and more lines for details in black and white pens. I stamped some words around my cat just to add a little detail. Then I grabbed my pen and wrote the quote. I am liking writing my quotes and this one worked out well in the spot on the left there. I enjoyed drawing and painting my pink cat so this will not be the last one of these you see. Maybe a purple one next. 

Have a great day
Sandy :)

Tuesday, August 25, 2015

Chunky mini Owl Canvas

I was going to paint a card for  my daughter for her recent birthday and instead I did this 6x6 inch chunky mini canvas. 

It is up on the Helmar blog today, so hope you pop over there
 and see all the details.  

Have a great day
Vicki-Ann :)

Teams I design for

Monday, August 24, 2015

She wanted to see the beauty...

I had to have another go at another girl today. I wanted to try to do hair a bit better. After looking at a few pins on Pinterest on how to draw hair. I saw that hair has wispy bits, yep of course it does. I had just never thought about that before. So many bits to a face until you go to draw or paint one you never think about.


I used DecoArt Americana paints in Ocean Blue and Vivid Violet for the background and used a brayer to paint it on. Then I used a stencil with Lemon Yellow for all the little flowers. I doodled around them with my black and white pen adding little highlights and dashes. Then it was time to draw my girl. I drew her then painted her in with DecoArt Media line Gesso so the next layers of colours stand out better. I used Deep Burgundy for her hair and then Flesh tone for her face with a tiny bit of the Deep Burgundy mixed into the Flesh tone to add some dimension to her face. I highlighted her nose and eyes with my white signo pen. Added little lines of black with my black pen, in her hair to add depth. I have been sketching a lot in a new small sketch book. Think all the eyes and faces I have been practicing drawing are really helping me to get more confidence with faces. 

Have a great day
Sandy :) 

Sunday, August 23, 2015

Lettering...

Today I wanted to play around with a different style of lettering. I think I got the hang of it and it did get easier to do once I got to the last letters.  I picked a big quote on purpose. Then I just kind of fit my quote around the flower and the girl. 


I am getting the hang of people, highlighting bits of the face and hair. (hair, oh hair how you thwart me.) Oh well practice, practice and then a bit more practice. I used Neocolor II for this and my water brush. I wanted to see how the Neocolor II went in my Moleskine without adding any Gesso first. To see how it would handle the water. Well I was really quite happy with the way it worked. I used Paint pens and black pen for the letters. Little spots in the background are from the France Papillon design cube and distress ink in Peacock feathers.

Have a great day
Sandy :)

Friday, August 14, 2015

Inspired...


I get together with a few friends on a Friday morning and we chat and we work on all different things. I always seem to work in my moleskine art journal and am getting quite good at taking everything I need in a small case. The first thing is though you have to know what colours and stencils you are going to need. So I kind of always have some idea of what I am wanting to make before I pack my case. Well I love the way Nika in Wonderland recently did a face and how it was peeking out from the stars. So as I have the star stencil I thought I would draw a face and have a go at that one too. If you want to see Nika's she has a wonderful youtube tutorial. Nika only has hers on one page and my book is always a 2 page spread its just the way I have found I like to work. So I wont go into too much detail today as Nika's Tutorial will show you everything you need to know. Isn't it fun though to see something and then try and do it in your own little way. I learn so much from Youtube. 

Going to link this up at Paint Party Friday.. 

Have a great day
Sandy :) 

Saturday, August 8, 2015

Inner Child...


Another art journal page finished in my Moleskine today. This is another of my characters I liked that I did in my other Artstronaut club journal. I copied a few of them on my printer, they are made from bits and pieces of the wonderful collage sheets that are a part of the club. This time I went bright using DecoArt Americana Turquoise Blue, Vivid Violet in the background, then some Brilliant Red in the circles. I used my finger in some Snow white and just gave them each a little highlight. It was tricky when the circles got so tiny up on the left. Used the Andy Skinner stencil, Have your say for the white letters. Bit of stamping with a couple of stamps here and there. Then lots of splatters in watered down DecoArt Media line Gesso. Splatters are fun, they seem to bring it all together. I went around all the circles with my black Stabilo pencil then with the waterbrush to darken. Then around them again in black pen and doodling with a bit of the white signo pen. Just trying to add depth and interest.  Around the main character and his bit of collage that he is standing on, I used a Neocolour II and then rubbed it in to blend out with my finger. 
I am going to enter this in a challenge this month for the group on facebook that I am in called Mixing it up every day.. You have to use your fingers to paint an art journal page. Looking forward to seeing what everyone is going to create. 

Have a great day
Sandy :)

Friday, August 7, 2015

Inner Voice...


I thought I would copy one of the characters I liked that I did in my other Artstronaut club journal on my printer. She is made from bits and pieces of the wonderful collage sheets that are a part of the club. Thought she deserved her own art journal page. I picked this one because I really like the tan colours that she is. I thought I would challenge myself to work in another set of colours and not the brights that I have been sort of stuck on. I started with the torn up pattern papers. I tore them roughly and then used Decoupage matte glue to adhere them in three spots. Then I blended the colours over the top of them so they were not just sitting on top. I used DecoArt Americana Burnt Sienna and Flesh Tone and blended them together. Then I used the Deep Burgundy with the Andy Skinner stencil Shedder. I had not used these colours and I really like the way they worked together. I then used the Andy Skinner Industrial Elements stencil and stenciled the arrow and the chevrons in Lamp Black. The words are from Dina Wakley affirmations stencil. Some Washi tape alphabet tape and then my main image was glued on. I went around her with NeocolourII and rubbed it in with my finger just to blend her into the page a bit.  
I was pleased with this one it was a lovely change to go with the brown darker colour scheme. 

Linking this up over at Paint Party Friday hi everyone..

Have a great day
Sandy :)

Monday, August 3, 2015

Index Card A Day Week Seven...

I have been playing along with the Index card a day prompts and this is the Seventh week done. More info on what ICAD - Index Card a Day is check out all the info over at Tammy's. Tammy has it all sorted and so organised, just pop over to Daisy Yellow. Join in the fun as there is no rules. You don't have to follow the prompts you can just do your own thing. The point is to just do a little Index card art every day and have fun along the way. 
No 44 Focus or Blur
I had this butterfly on my desk, I had used it to mask something in an art journal page that I had been working on and it was just sitting there. So thought once I saw it that it was perfect for a focus prompt. I also had that background the butterfly is sitting on. I had used it to stamp a frame stamp to see if it was inked up. So I just glued the butterfly on top of it. Painted the Index Card with left over DecoArt paint. Most of my painted backgrounds on index cards are left over paint. 

  No 45 No Prompt
This one the background was from my little Gelli plate.  
The hat was a light fitting in a catalogue. 
Clock tummy and my hand drawn arms. The artstronaut club collage sheet leftovers for the numbers at the side. 

  No 46 No Prompt
I did this on a art journal page and had fun
 so just kept going on an index card. 

 No 47 No Prompt
I really like drawing pipes. So this was a fun one to draw. I am always trying to draw different little people. 


 No 48 No Prompt
Flowers can never have too many flower ICAD's.

 No 49 Black and White
Zendangle time.

No 50 Kimono
I drew her and she just looked so lonely on the plain background of the ICAD.
So I used some pretty paper and glued it onto another ICAD card. Fussy cut her out and glued her on. 

Tammy made us cool badges so had to pop this one on my blog..

So hope you like my week of ICAD cards its fun and I am still going even though a lot of people are finished. The ICAD still runs till the end of August. So will finish mine off only have 8 more to go. Some of the last ones look like fun to do so off to do week 54 envelope. 

Have a great day
Sandy :)