Monday, November 27, 2017

Journal cover featuring sewing.

Today I wanted to show how you can incorporate some sewing into your art. There is more details over on the Helmar Creative Team page.  I have been loving using my sewing machine to add some texture and details into my art. I have been using it on my collage pieces and then using my Helmar Tacky craft glue to glue it down.


First I sanded back the edges of my wooden cover. I then traced the cover of my wooden journal onto the back of the scrapbook paper. Then cut that out with my scissors.

Using my Helmar Decoupage Craft Paste I covered the wooden journal cover with glue with my paint and glue spreader.


 Then popped the paper that I had cut out over the top and using the paint and glue spreader smoothed out any bumps so you get a fabulous seal. Once this is dry I covered the back just tearing book and dictionary papers and using the Helmar Decoupage Craft Paste and the glue spreader I just covered it all till no wood is showing.


To get great edges I use a piece of fine sandpaper and smooth all the edges. You could also use a cardboard nail file. That also works really well. I used some Distress ink and a blending tool on the edges of the wooden cover and on the edges of the papers. So they would blend together a bit better.

To do the collage I wanted to use that butterfly as my focal point so I gathered papers that matched my background and layered till I was happy with the look of it. Making sure that the book paper underneath the butterfly had enough room to sew around it. Then using the Helmar Tacky Craft Glue I put the layers together. Once it is dry, I sewed it all together with my sewing machine.


I thought it still needed something underneath the sewn part so I grabbed some washi tape and some plasterers tape and put that directly on my cover.  I grabbed some of the Decoart Crackle Paste and a Palette knife and added it to 3 of the corners. I just love crackle texture.


To add the sewn part I used the Helmar Tacky Craft Glue and the paint and glue spreader and put it on the back. Making sure to Spread it around to all the edges. This holds all those layers on to the cover really well.


Here are some of the inside pages. Using a clip I just stuck some of the strips of paper I had left over so I could use them in my journal.


You could easily use some stiff cardboard and use this same technique. I hope this tutorial helps you to make yourself a journal.

Have a great day
Vicki-Ann :)

Thursday, November 9, 2017

Spring flowers

Well Spring has sprung here in Australia and my garden is in full bloom. So thought I would do some flowers on a canvas with lots of layers of collage. You can find more details about this canvas on the Helmar Creative team page.


I covered the canvas with random scrap papers. I used the inside of envelopes, book paper, dictionary paper and any scrap of patterned paper. I tear these up leaving rough edges. Using the Helmar Decoupage and craft paste I layer the papers.


I always add the Helmar Decoupage and Craft Paste to the back of the item I am gluing and the surface I am gluing onto. This gives a great adhesion. Then using the paint and glue spreader I go over it getting out any air bubbles.


I used some modeling paste through a Tim Holtz stencil to add some texture.


I then used some Decoart Americana paints and painted over the collage papers. I like just a bit of the layers to show through with pops here and there to add interest.


I then cut out circles of book paper and using some of the papers from my desk that I used when I was cleaning off from my last Gelly plate day. I cut out some flower petals. Then placing them so I could add stems I used the Helmar Decoupage and Craft Paste and the paint and glue spreader and put them on. Remember to use the paint and glue spreader again so you get the bubbles out. This all dries clear so no need to worry about any excess glue. Wait for all of it to dry I like to leave it all for a few hours at least or come back the next day. I have wrecked many a pen by trying to draw over the wet paint. So now it is time for the doodling I added stems and lines with my black pen and white pens. I love doing all the doodling.


So for the final step once the pen is dry give it 2 coats of the Helmar Crystal Kote Matt sealant this stops it from fading and seals it all in perfectly.


Friday, September 22, 2017

Art journal fun...

I have been busy in my art journal just playing with my Decoart Americana acrylic paints. 


I just love doing circles and adding layers and layers of different paints till I get something that I think is done. 


Adding lots of stamps and stencils is one of the best parts. I so love adding splatters of watered Gesso at the end such fun to do. 


I have been using my mop up papers on my desk in lots of things lately and I used it in this one to add the petals for the flowers. Lots of doodling for the stems and this one I did live on Periscope. You can find the replay for it HERE at @sandybeachart.

Linking this up with Paint Party Friday

Have a great day 
Vicki-Ann :)

Wednesday, September 20, 2017

Birthday Owl Canvas.

Hi everyone Vicki-Ann here for the Helmar Creative Team today. Recently my daughter had her birthday and every year I make her a small owl canvas instead of a card. 


First I painted my background using 3 different Acrylic colours and a palette knife blending to get some variations in colours. I added clouds and the big flower adding white painted highlights. 


Using the papers that I have on my desk I cut the owl shape and added that using the Helmar Decoupage and Craft Paste and the paint and glue spreader. I add the Helmar Decoupage and Craft Paste to the back of the paper and to the canvas and then spread out any bubbles. Once this was dry I added painted wings adding layers of paint to try and match the papers on the body. I added circles of the vintage book paper with more of the Helmar Decoupage and Craft Paste  I then thought he needed a beak so cut some more paper for the beak. Once it was all dry I added eyes and painted the eyelids in a skin tone colour.  


Once everything is dry I love to add tiny details and doodles. Mainly just squiggles and lines filling in with my Signo Uniball pen in white. I like to leave it all overnight to dry thouroughly then I add 3 coats of the Helmar Crystal Kote Picture Varnish Matte Spray This seals it and keeps it from fading.  My daughter loved her and I gave her a small wooden easel so it could sit on the shelf.

Have a great day 
Vicki-Ann :)

Tuesday, August 22, 2017

Helmar Dust Away

Recently for the Helmar Creative Team I have been having some fun using the
  Helmar Dust Away Spray.


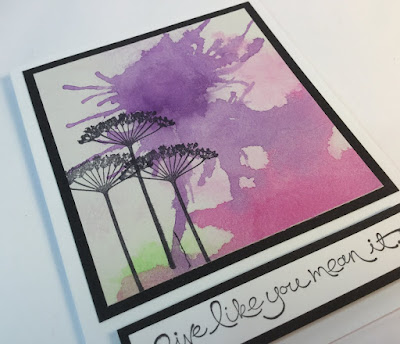
I sprayed the paper with water. Then I added puddles of watercolour. 


I found that you had to work quickly so the watercolour did not absorb into the paper. I dabbed the watercolour on with a watercolour brush adding more water as well. Then when you could see you had a puddle. I used the Helmar Dust Away Spray and pointed the long nozzle in the direction I wanted the puddle to go. 


Once they were dry I cut them up and added some stamping in black. I then backed them in black card stock and mounted them on a white card. 


I liked using the Helmar Dust Away Spray it really made it easy and fun. I think this would also make an awesome background for a scrapbook layout. 


Have a great day
Vicki-Ann :)

Friday, August 11, 2017

Playing card ATC's with Helmar

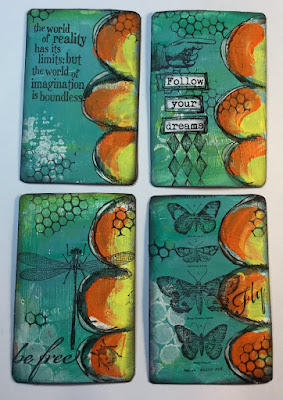
Over on the Helmar Creative Team page I recently posted about an Artist Trading Card or ATC swap with the Australian art swap group on facebook. It's where you re-use playing cards to make mini art. They have been traded by artists for years.  With this swap you had to make 22 ATC's and send them off and then they were mixed up and you got 22 different ones back. 
So these were the ones I made for the swap. 


So to start they said the easiest way was to glue all the cards on to a piece of card stock and treat it as one page. Thought that was a brilliant idea so I used my favourite product the 
Helmar Decoupage Craft Paste to glue all my playing cards on.


I like to glue the paper and the back of the cards and then press any bubbles out with the Helmar glue spreader. You get a really good finish and it dries clear.


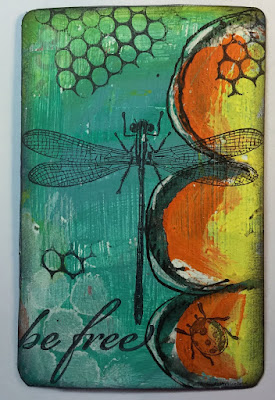
I used Decoart Americana paints and some of my home made stencils to do the shape at the sides. The stamps were Tim Holtz and Darkroom door for the dragonfly, lady bug, be free and fly words. Also the Prima honeycomb stamp. 

To put my quotes on I used the Helmar Tacky glue.


This was such a fun project to do and I am looking forward to getting my 22 ATC's in the mail. 

Sunday, July 16, 2017

Follow Your Heart

Recently for the Helmar Creative team I made a small canvas using some scrap papers and my favourite Helmar Decoupage and Craft Paste for the collage background. To see even more details pop over to the Helmar Creative Team page.


I covered my canvas with torn scrap papers, I just choose some that appeal to me. I have been given a few random pieces of different papers as gifts with letter journals that I have received. So this has some of those included, it was really nice to be able to use them in this project.


Using the Helmar Decoupage and Craft Paste and the glue spreader. I added glue to the canvas and the back of the paper and then use the glue spreader to ease out any bubbles. This gives you a great smooth finish.


Then I added some Decoart paints in 3 different shades of blue and Gesso. Then added some stencilling with the Crafter workshop chicken wire stencil.


While this was drying I worked on the layers. I used some Gesso on the hessian and the gauze to blend them together a bit. Then used some Helmar Tacky Craft Glue to stick them together. For the Heart I used some Helmar Decoupage and Craft Paste and glued it on to some cardstock to give it strength. Then I cut it into a heart shape and added a little plasterers tape, gesso and paint. I also painted another sheet of book paper so that I could stamp the words on it for my saying.


To add all the layers on top of my background I first placed it all together without glue and then took a photo to see if it looked right.


Then when I pull it off to glue it all on, I have a reference to know where my layers went and what order I wanted them to be. I have learned this is a great step when working on layers as otherwise you might not get the placement were you want it to be. You can look at your photo and go yep that is right. I wanted all of my postage stamps showing from the background so that is why I was a bit fussy with where I wanted it to be placed.


I wanted the plasterers tape on the background then the hessian and gauze layer. I glued these together with Helmar Tacky Craft Glue. Remember to pop some of the Helmar Tacky Craft Glue over the plasterers tape even though it is sticky you will still need to put some of the Helmar Tacky Craft Glue on it. It dries clear so you wont see it. I spread it around over it. Next is the heart layer that I have used the Helmar Tacky Craft Glue to pop the torn stamped words on.


When I stuck the heart on top using the Helmar Tacky Craft Glue I noticed that I had a bit more dimension than I thought. So I used some of the Helmar Liquid Scrap Dots wonderful stuff that. I just raised the bits up that needed the extra dimension and squeezed the Helmar Liquid Scrap Dots on the parts that needed it. It was under the ends of the words and the tips of the heart.


Have a great day
Vicki-Ann :)

Helmar glue doodle flowers.

I needed to re-stash my cards they were getting rather low. I like to have a few on hand for quick gift giving and for thank-you notes.
So today I am using the Helmar Decoupage and craft paste. I filled a Fineline applicator bottle as I wanted to do some doodling with it. So after filling my bottle, I grabbed a piece of watercolour paper. Then using the fine line applicator bottle, I doodled flowers, leaves and added some spots. It worked really well and was really easy to use. I liked that it gave me such fine lines of glue.


I then left it to dry and sprayed the paper randomly with Dylusions ink spray blotting any excess.


I made 3 different cards have a few more yet that I can make but these are the 3 sizes I made so far. 14x10.5 cm 10x10.5cm and an ATC 9x6.5cm. I backed the watercolour paper with black cardstock and then I placed it on white cardstock.


This was a quick and fun project to do and I know I will be making more.

Have a great day
Vicki-Ann :)